A Guide On How To Download & Use Our DIY Foam Sheet Templates
Do you want to make a statement with your own customisable foam signage at your next event or wedding? Now you can with our easy-to-assemble foam sheet templates.
Our foam sheet templates are designed to be used with our Strass wet & dry floral foam sheets, and polystyrene sheets. This helpful blog outlines the step-by-step instructions on how to print your template, and how to cut your design out of the foam sheet.
What You Need:
- Apron – to protect your clothing from any foam dust.
- Craft Scissors – to cut out the paper template NOT the foam sheet.
- Black Marker – we do not recommend using a pen as its sharp end may damage the foam or polystyrene sheet.
- Clear Sticky tape – only needed if you are using the jumbo templates.
- Short-blade Knife – in both videos our florist uses a short bud knife. A shorter knife allows you to have more control and accuracy when cutting the foam or polystyrene sheet.
- Mask – dust particles released when cutting may affect people with allergies.
- Gloves – these are optional but recommended if you have sensitive skin.
Tips:
- We recommend using wet floral foam for any design, even if you don’t intend on using fresh flowers, because it is easier to cut. Dry floral foam and polystyrene sheets can still be used, but these materials are more difficult to cut.
- We DO NOT recommend using a hot Styrofoam cutter to cut wet or dry floral foam, as this will not cut through the foam and instead create smoke. However, you can use this tool to cut polystyrene sheets.
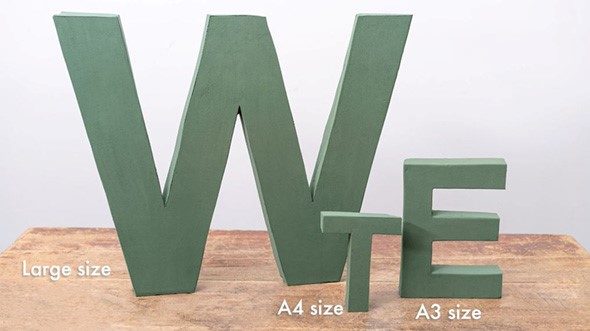
Example of Template Sizes:
How To Use A4 & A3 Foam Sheet Templates
Step-By-Step Instructions:
- Print off your chosen template pattern.
- Using your craft scissors, cut around the outline of your printed pattern.
- Using a clean workspace, place your foam or polystyrene sheet on the workbench and place your pattern on top of the foam.
- Take your black marker and outline the shape of your pattern onto the foam sheet.
- Using your knife, start to cut out the pattern. When cutting the foam, be careful to not put too much pressure on the opposite side of the foam as your hand might create impressions or dents in the foam.
- If you want to create sharp corners on your design, we recommend cutting 2cm past the end of the outline of your shape, otherwise, a sharp corner may not be achieved.
- Make sure to cut all the way through the foam before taking your design out of the foam; otherwise your foam sheet might crack and break.
- Be gentle when removing your shape from the foam as the foam is brittle.
- If you are using wet floral foam, you can easily smooth down the edges of your shape using your fingers. However, this is not necessary as the shape with be later covered with flowers and other decorations which should completely cover the foam.
- Your foam shape is ready to decorate!
Download Templates:
A4 LETTERS & NUMBERS TEMPLATES
A3 LETTERS & NUMBERS TEMPLATES
How To Use Jumbo Foam Sheet Templates
Step-By-Step Instructions:
- Print off your chosen template pattern.
- Because these are jumbo patterns, your chosen pattern will be broken up into multiple A4 pages. Each page will be marked with numbers that need to be placed in order to form the shape. We recommend you assembling the pattern before you cut the template out.
- Using your craft scissors, cut around the outline of your printed pattern.
- On a clean workbench, reassemble your pattern and secure it together on all joining sides using clear sticky tape.
- Using a clean workspace, place your foam or polystyrene sheet on the workbench and place your pattern on top of the foam.
- Take your black marker and outline the shape of your pattern onto the foam sheet.
- Using your knife, start to cut out the pattern. When cutting the foam, be careful to not put too much pressure on the opposite side of the foam as your hand might create impressions or dents in the foam.
- If you want to create sharp corners on your design, we recommend cutting 2cm past the end of the outline of your shape, otherwise, a sharp corner may not be achieved.
- Make sure to cut all the way through the foam before taking your design out of the foam; otherwise your foam sheet might crack and break.
- Be gentle when removing your shape from the foam as the foam is brittle.
- If you are using wet floral foam, you can easily smooth down the edges of your shape using your fingers. However, this is not necessary as the shape with be later covered with flowers and other decorations which should completely cover the foam.
- Your foam shape is ready to decorate!
Download Templates:
JUMBO LETTERS & NUMBERS TEMPLATES
At Koch & Co, we have a huge range of fun accessories and tools that can help decorate your foam design, including artificial flowers, decorative picks and more. You can shop our huge range both in-store and online.
The post A Guide On How To Download & Use Our DIY Foam Sheet Templates appeared first on Koch & Co Blog.
